
- Clean, clear photos help homeowners understand the quality of your work faster.
- Before-and-after photos are some of the most valuable images a contractor can upload.
- Good lighting and simple camera positioning can dramatically improve a project photo.
- Clean the work area before taking your final photos whenever possible.
- Show the entire project, but also photograph important details and craftsmanship.
- Avoid excessive filters, cluttered backgrounds, screenshots, and blurry images.
- Upload several strong photos instead of relying on one image to tell the whole story.
- Organizing project photos by job makes it easier to build a professional portfolio over time.
Your Photos are Part of Your Reputation
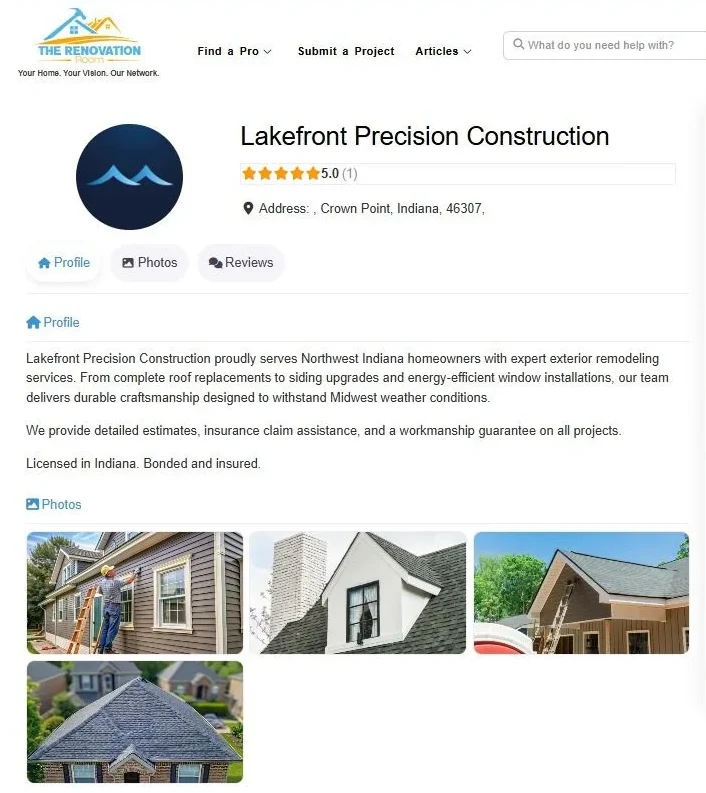
Contractors spend years developing their skills, building relationships with customers, and improving the quality of their work. However, when a potential customer finds you online, they may know almost nothing about that history.
They are looking for evidence.
Your project photos provide some of that evidence.
Your photos should help a homeowner quickly understand what you build, repair, install, or improve.
Imagine a homeowner searching for someone to remodel a bathroom. They find two contractors with similar services and experience. One profile contains three dark, blurry photos taken while tools and debris are still scattered around the room. The other contains clear before-and-after images showing the original bathroom, the renovation process, the finished tile work, the shower, and the completed vanity.
Even if both contractors perform excellent work, the second contractor has made it much easier for the homeowner to understand the finished product.
That is why photography should become part of your normal project process.
You do not have to create a full photoshoot for every project. Simply build a habit of taking a few intentional photos before work begins, during important stages, and after the project is completed.
Try to think about the questions a homeowner might have when viewing your photos. What did the space look like originally? What problem did you solve? What changed? What details demonstrate your craftsmanship? What does the completed project look like?
When your project gallery answers those questions, your photos become more than decoration. They become part of your business reputation.
Always Capture the Before, During and After
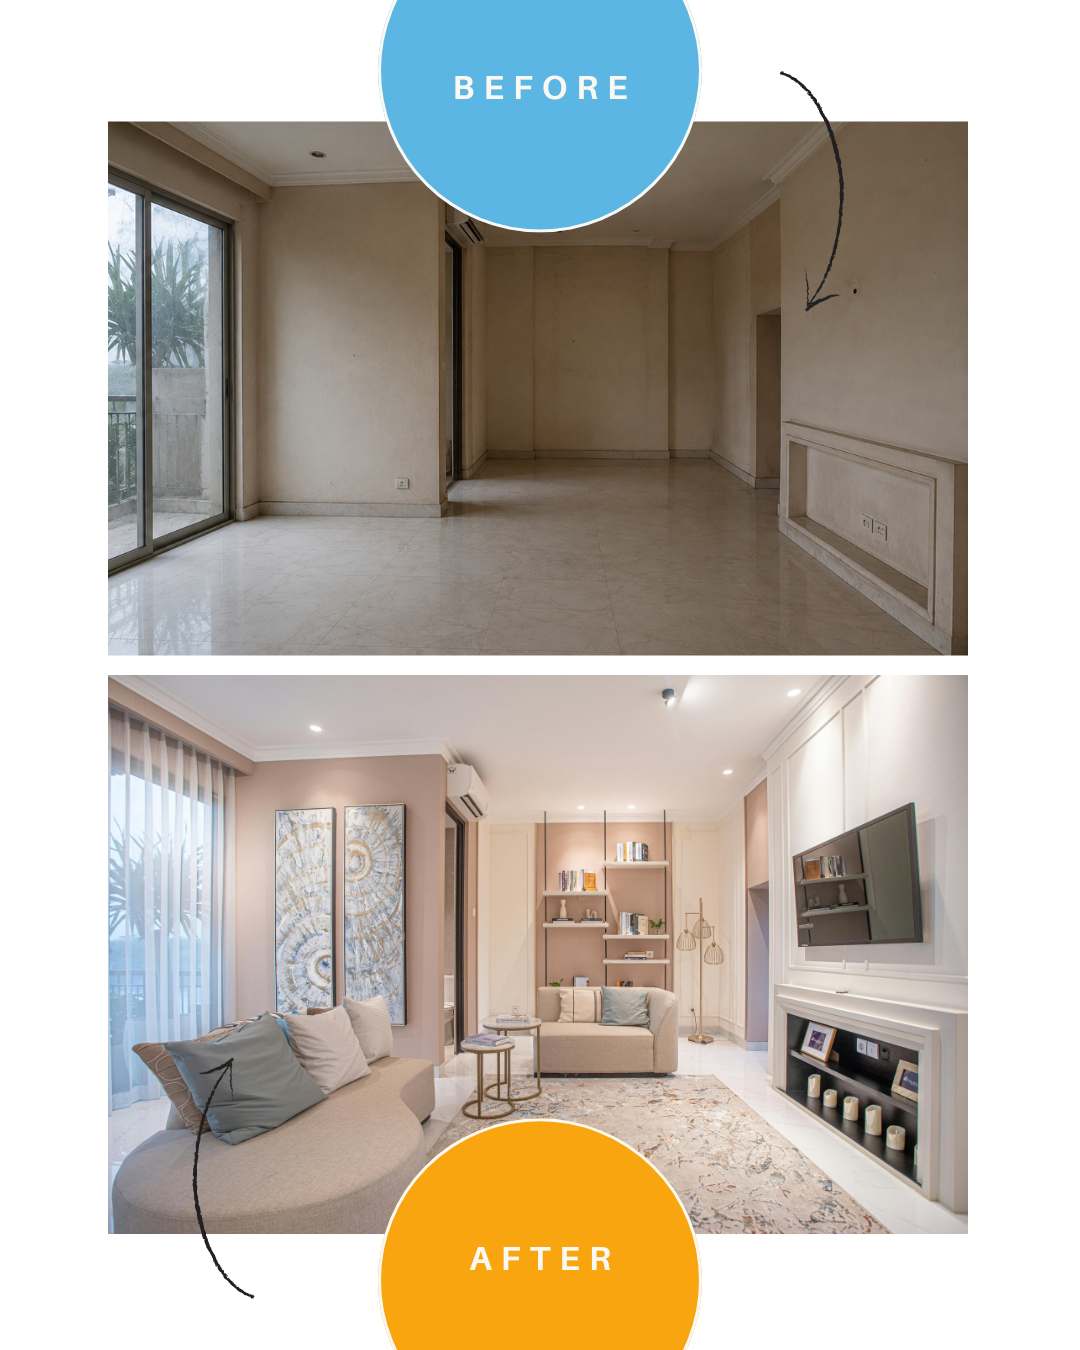
One of the easiest ways to improve your project photography is to document the entire transformation.
Many contractors remember to photograph the finished project but forget to photograph what existed before they started.
That first photo can be extremely valuable.
Before-and-after photos allow homeowners to see the transformation instead of simply seeing the final result.
For example, a contractor replacing an outdated deck should photograph the original deck before demolition begins. A roofer might document damaged shingles before showing the finished roof. A landscaper can photograph an overgrown yard before showing the new lawn, garden beds, or hardscape.
Try to take the “before” photo from a position you can recreate later. Once the work is complete, return to approximately the same location and take the “after” photo from the same angle.
This creates a much stronger visual comparison.
Progress photos can also help tell the story of the project. You might photograph demolition, framing, electrical work, waterproofing, installation, painting, or another important stage depending on your trade.
You do not need to upload every progress image publicly. Some may simply become documentation for your records.
However, carefully selected progress photos can demonstrate the amount of work involved in a project. Homeowners often see a beautiful finished kitchen or patio without realizing what went into building it correctly. Showing some of the process helps educate them.
For larger projects, try creating a simple sequence:
- Before the project.
- Early construction or demolition.
- Major installation or transformation.
- Finished project.
- Detail shots.
This gives potential customers a much better understanding of your work than one final image alone.
Use Better Lighting and Simple Camera Angles

Lighting is one of the biggest differences between a photo that looks professional and one that looks rushed. Fortunately, better lighting does not require expensive equipment.
Whenever possible, use natural daylight and avoid photographing dark rooms or harsh shadows.
For interior projects, open curtains and blinds before taking photos. Turn on the room’s lighting as well, especially if the fixtures are part of the renovation. Try photographing the room during the day rather than late at night. If sunlight is extremely bright, however, watch for large areas that become completely white or dark shadows that hide important details. Moving a few feet or changing the camera angle can often solve the problem.
Exterior projects usually photograph well during the morning or later afternoon when sunlight is less harsh. Very bright midday sunlight can create deep shadows and make certain materials difficult to see. Camera positioning matters too. Before taking a photo, straighten your phone and look carefully at the screen.
- Are the walls leaning because the camera is tilted?
- Is half of the project cut off?
- Is your finger covering the corner of the camera?
- Are you standing too close?
For rooms, step backward whenever possible and photograph from a corner or doorway so homeowners can see the overall space.
Avoid relying too heavily on extreme wide-angle settings. They can make rooms appear larger than they actually are and sometimes distort walls and cabinets.
The goal is not to make a project look bigger or different.
The goal is to make it easy to see.
Before leaving the project, review the photos on your phone. Zoom in and check whether the important areas are sharp. Spending an additional minute checking can prevent you from discovering later that every image is blurry.
Prepare the Space Before Taking Your Final Photos
You may have completed beautiful work, but if your final photograph contains ladders, trash bags, extension cords, empty boxes, dirty rags, buckets, and leftover construction materials, those items will compete for attention.
The finished project should be the focus of the photo, not the mess surrounding it.
Whenever possible, photograph the project after cleanup.
Remove tools that are no longer needed. Sweep floors. Pick up packaging and construction debris. Close cabinets. Straighten materials. Wipe down visible surfaces.
For landscaping projects, move wheelbarrows, hoses, bags, and equipment out of the frame.
For bathroom projects, remove cleaning supplies and construction materials.
For kitchen renovations, clear countertops unless a few simple items help show how the space functions.
There may be situations where complete cleanup is not possible. That is understandable. Construction sites are working environments.
In that case, adjust your camera angle so unnecessary clutter is not the first thing someone notices.
Also pay attention to personal information in the background. Mail, documents, license plates, family photographs, addresses, security systems, computer screens, or other identifying information may appear in a photograph without you noticing. Being thoughtful about what appears in your photographs does two things at once. It helps your work look more professional, and it demonstrates respect for your customer’s property.
Show the Details That Demonstrate Your Craftsmanship
A wide photo of the completed room or exterior gives homeowners context, but wide shots do not always show the quality of the work.
That is where detail photos become important.
Photograph the features that demonstrate your craftsmanship, precision, materials, and problem-solving.
A tile contractor might photograph grout lines, shower niches, transitions, and detailed patterns.
A carpenter could photograph custom trim, built-ins, cabinetry, joints, or finish work.
A roofer might show flashing, vents, valleys, shingles, gutters, or completed roof lines.
A painter could photograph crisp edges, cabinetry finishes, accent walls, or repaired surfaces.
A landscaper may highlight edging, plant beds, retaining walls, drainage work, pavers, or outdoor lighting.
Think about what another contractor in your trade would notice. Those details often matter to homeowners too, even if they do not know the technical terminology.
A useful project gallery typically includes a mixture of images. Start with one or two wide photographs that establish the entire project. Then move closer.
Photograph several important features.
If you solved an unusual problem, document that too.
For example, if you repaired hidden water damage before remodeling a bathroom, one progress photograph can help explain why the project involved more than installing new tile.
You can also add a brief description when uploading your images.
Instead of simply labeling a photo “Bathroom Remodel,” provide a little context:
“Full bathroom renovation including new tile shower, vanity, flooring, fixtures, and lighting.”
That short description gives the homeowner more information about what they are seeing. The combination of strong images and useful descriptions creates a much more informative portfolio.
Choose and Upload Your Best Photos
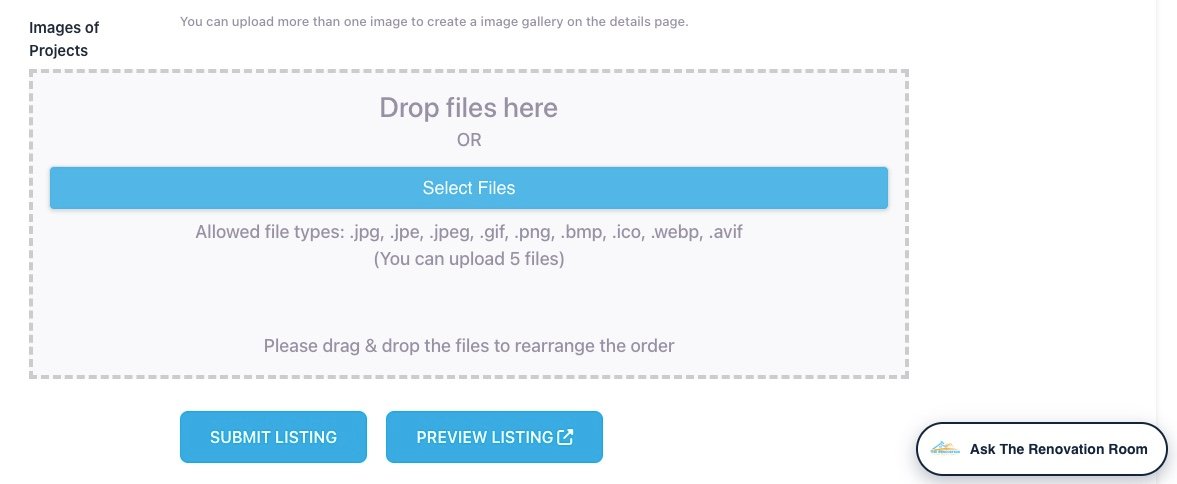
Taking good photographs is only the first half of the process. Choosing which ones to upload matters just as much.
Contractors sometimes upload every image from a project, including duplicates, screenshots, blurry photographs, and unfinished stages that do not add useful information. More photos are not automatically better.
A smaller group of strong, purposeful photos usually creates a better impression than dozens of repetitive images.
Start by deleting obvious mistakes. Remove images that are blurry, extremely dark, accidentally taken, nearly identical, or unrelated to the project. Then choose the photographs that tell the project story most clearly.
For many projects, five to ten strong images may be enough:
- One before photo.
- One or two progress photos.
- Two or three final wide shots.
- Several detail photos.
- Larger renovations may justify more.
Keep editing simple.
Cropping an image, straightening the horizon, or making a small brightness adjustment is usually fine. Avoid heavy filters that dramatically change the color of materials.
Homeowners should see a realistic representation of the finished work. It is also useful to organize your photos immediately instead of allowing thousands of jobsite pictures to accumulate in your phone.
Create folders based on project name, customer, date, neighborhood, or trade.
For example:
“Oak Park Kitchen Remodel – August 2026”
“Deck Replacement – Naperville”
“Bathroom Remodel – Chicago”
A simple organization system makes it easier to find photos later when updating your website, social media, business listing, or The Renovation Room profile. Over time, this creates an organized visual portfolio of your best work.
Upload images on your listings here: https://therenovationroom.com/add-listing-pros/pros/
Conclusion
Great project photos do not require an expensive camera or professional photographer. They require intention. Take photos before work begins. Capture important stages of the project. Use good lighting. Clean the area before photographing the final result. Show both the entire project and the craftsmanship in the details. Most importantly, make photographing your work a habit.
Every completed project is an opportunity to add another example of your experience to your portfolio.
Homeowners want to know what you can do before they invite you into their home or trust you with a major renovation. A clear portfolio helps answer that question. Your project photos cannot replace great workmanship, communication, reliability, or customer service. But they can help homeowners discover and understand the quality of work you are already doing. If you are a contractor using The Renovation Room, keep your project photos updated so homeowners can see real examples of your work when they visit your profile. Show the transformation. Show the details. Show homeowners what a job well done actually looks like.
Frequently Asked Questions
How many project photos should contractors upload?
There is no perfect number for every project. A good starting point is approximately five to ten strong photographs that clearly show the before, important stages, completed project, and key details. Larger projects may benefit from additional images. Focus on quality and variety rather than uploading dozens of similar pictures.
Do I need a professional camera for contractor project photos?
No. Modern smartphones can take excellent photographs for websites, social media, and contractor profiles. Good lighting, a steady camera, thoughtful positioning, and a clean work area are often more important than expensive equipment.
Should contractors post before-and-after photos?
Yes. Before-and-after images are extremely useful because they help homeowners understand the transformation. Whenever possible, photograph the before and after from approximately the same location and angle so the difference is easy to see.
Can I edit my project photos?
Basic edits such as cropping, straightening, and making small lighting adjustments are generally helpful. Avoid excessive filters or edits that significantly change the color, size, condition, or appearance of the finished work. Your photos should accurately represent the project.
Should I include photos of the construction process?
Yes, particularly when progress photos help explain the complexity of the work. You do not need to upload every construction photo, but selected images showing demolition, framing, installation, repairs, or other important stages can help homeowners understand your process and expertise.